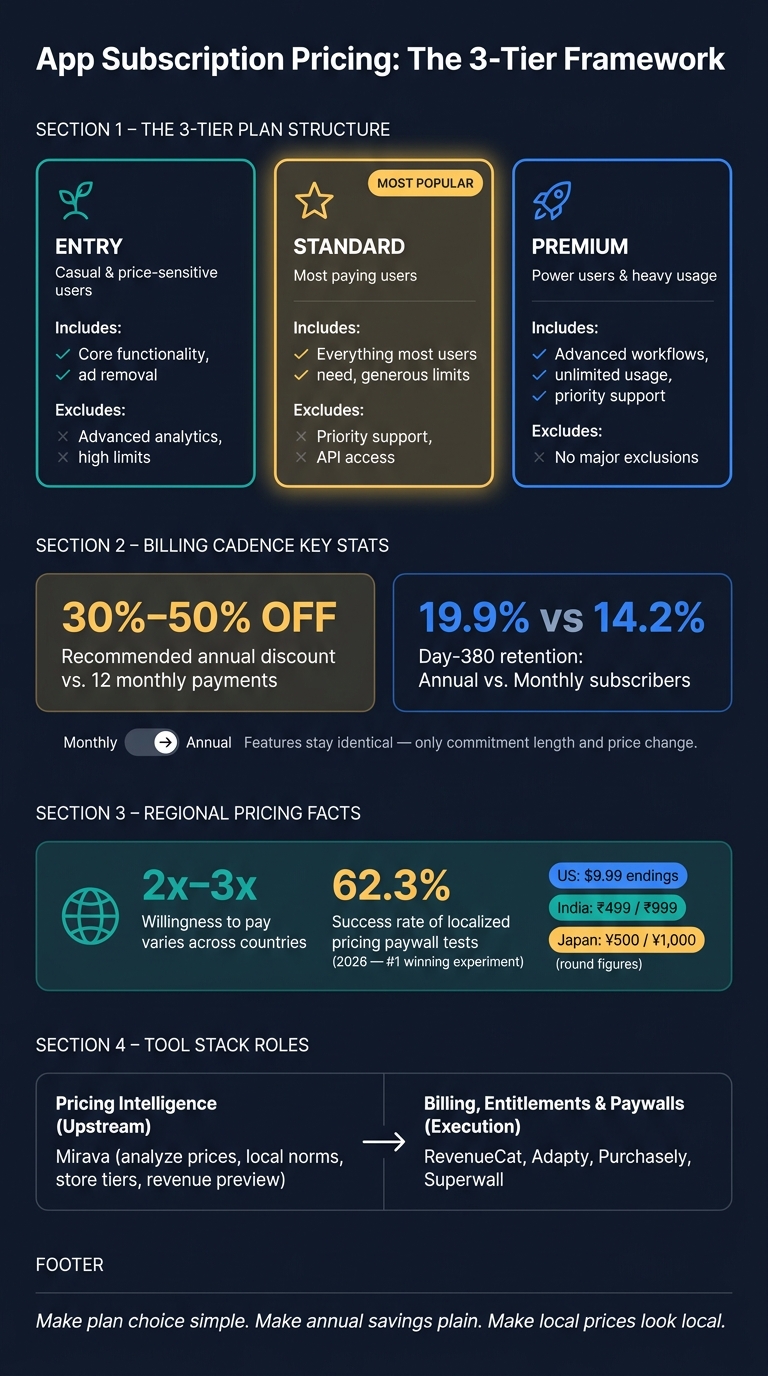
Most apps do not have a pricing problem. They have a plan structure problem. I’d keep it simple: use three tiers, keep monthly and annual features the same, and localise prices by market instead of relying on store conversion alone.
If you want a clean setup that users can scan fast, I’d use this model:
- Entry for casual or price-sensitive users
- Standard for most paying users
- Premium for heavy users who want more limits, support, or advanced tools
- Monthly and annual as billing choices, not different plans
- Regional pricing based on local buying power, not just FX conversion
A few numbers matter here:
- Three tiers are usually enough
- Annual pricing often lands at 30% to 50% off 12 monthly payments
- Annual retention can beat monthly, with 19.9% at Day 380 vs. 14.2% for monthly subscribers
- Willingness to pay can vary by 2x to 3x across countries
- Localised pricing was a top paywall test area in 2026, with a 62.3% success rate
I’d also keep the tool roles separate. Mirava sits upstream to analyse and recommend prices by market. RevenueCat, Adapty, Purchasely, and Superwall handle billing, entitlements, and paywalls after pricing is set.
App Subscription Tier Structure: 3-Tier Pricing Framework & Key Stats
How to price your subscription app globally - Featuring Jacob Rushfinn
sbb-itb-43fe43a
Quick comparison
| Area | What I’d do | What to avoid |
|---|---|---|
| Tier count | Keep it to 3 paid tiers | Adding 4+ plans that slow choice |
| Tier logic | Build around user segment and value | Grouping plans by internal product modules |
| Upgrade path | Make each step easy to explain | Long lists of small feature differences |
| Billing cadence | Keep monthly and annual feature sets identical | Adding annual-only perks that create a hidden extra tier |
| Annual discount | Use about 30% to 50% off yearly | Small discounts that do not change behaviour |
| Regional pricing | Localise by country and local price norms | Copying U.S. prices through store conversion only |
| Tool stack | Use Mirava for pricing analysis, then billing/paywall tools for rollout | Mixing pricing decisions with billing setup |
If I had to reduce the whole article to one line, it would be this: make plan choice simple, make annual savings plain, and make local prices look local.
1. Start with user segments and keep the plan lineup small
More tiers usually mean more hesitation. Once an app gets to four or more paid plans, people are more likely to pause, second-guess the choice, or drop out of the purchase flow altogether.[1][2][4]
So keep the lineup tight first. Then map each plan to a clear user segment.
Define Entry, Standard, and Premium by job-to-be-done
Build each tier around the job it helps the user do, and the amount of value tied to that job.
Entry is for casual users or price-sensitive buyers who want the core job done without much commitment. Standard strips out the main friction for engaged users. Premium is where you put advanced tools, higher usage limits, or priority support for power users.
This structure also helps with price anchoring. A $29.99 Premium plan can make a $9.99 Standard plan look like the sensible middle choice rather than a stretch.[4][8]
Choose tier names and upgrade paths that are obvious
Names matter more than most teams think. Custom labels often slow people down. Simple tier names like Basic, Pro, and Plus are easier to scan and compare.[4]
The upgrade path should be just as clear. Each higher tier needs to include everything in the one below it, plus one obvious step up. If the difference between plans is nothing more than a long checklist of minor extras, people struggle to see the point of moving up. As Oğuz Delioğlu, Founder of Appalize, says:
"If the difference between Basic and Pro is 8 small features, users can't articulate why they should upgrade." [2]
With the lineup in place, the next step is deciding what each tier should include.
2. Package features around value, not internal product modules
A common packaging error is building plans around your product org chart instead of the job the user is trying to get done. Users don’t buy modules. They buy outcomes. Set tiers by user value first, then map features into those tiers based on what each segment needs.
Put core access in Entry, broad utility in Standard, and advanced extras in Premium
Entry should solve the main problem well enough that users feel the product working for them. That means clear core access, while keeping advanced analytics and higher usage limits for higher plans. Standard should cover the day-to-day needs of most users. Premium is where you put the heavy-duty parts: higher caps, advanced workflows, priority support, or exclusive content that changes what a user can do in a meaningful way.[2][8]
| Tier | Include | Exclude | Target Outcome |
|---|---|---|---|
| Entry | Core functionality, ad removal | Advanced analytics, high limits | Basic problem solving |
| Standard | Everything most users need, generous limits | Priority support, API access | Regular, reliable utility |
| Premium | Advanced workflows, unlimited usage | No major exclusions | Maximum performance/ROI |
Use limits, support tiers, and exclusivity with care
Usage caps are one of the cleanest ways to separate tiers. Storage bands such as 1 GB, 10 GB, and unlimited, project limits, or AI request quotas give users a plain reason to move up without making the lower plan feel crippled.[2][8] Premium can also justify its place with priority support or features reserved for teams or heavy users.
The line is simple: Entry still has to get users to the core benefit. If the first paid tier feels cramped before users see the product’s value, conversion drops and trust takes a hit. Pricing should reflect the value delivered, not your internal cost base or a long feature checklist. Good gating creates a better fit between plans and needs. Bad gating just annoys people.[7]
Check that every tier has a clear reason to exist
Each tier needs a crisp reason to exist. If you can’t explain in one sentence why someone should pick Standard instead of Entry or Premium, that middle tier is weak. In practice, low take rates or refund spikes usually mean Standard is either too close to Entry on features or too close to Premium on price.[8]
Once the feature set is set, keep the same tier structure across monthly and annual billing.
3. Add monthly and annual billing without changing the tier itself
Once the tier lineup is set, monthly and annual are just payment options inside the same tier. The tier sets the value. Billing sets the timing.
Keep features identical across monthly and annual versions
Standard monthly and Standard annual should include the same features. If annual users get extra perks, you’ve effectively created a fourth tier.
"The difference between monthly and annual should be commitment and annual discount, not extra features. This keeps the pricing structure clean." - Adapty [8]
A clean paywall usually handles this best with a Monthly / Annual toggle at the top. The feature list stays the same on both views. Only the price and commitment length change.
Set annual discounts that feel meaningful but remain sustainable
A good rule of thumb is to price annual plans at about 30% to 50% off the cost of 12 monthly payments. That discount tends to feel worth taking, while still making sense from a unit economics standpoint. It also lines up with subscriber behavior: annual plans retain better, with 19.9% at Day 380 versus 14.2% for monthly subscribers [10]. That longer lifetime can offset the upfront discount.
Show the annual price next to its monthly equivalent, like $79.99/year or $6.67/month [8]. This makes the trade-off easy to scan. Users don’t have to do the maths in their head, and that usually helps on the paywall.
If you’re selling across markets, localise monthly and annual prices together so the savings ratio stays in line by country. This is where pricing logic needs to stay connected across regions, even if your billing stack runs through tools like RevenueCat, Adapty, or Purchasely. Mirava fits upstream here: it helps analyse price points and discount structure before those prices are pushed into billing and paywall systems.
With the billing structure fixed, the next step is translating those prices into store-ready regional tiers.
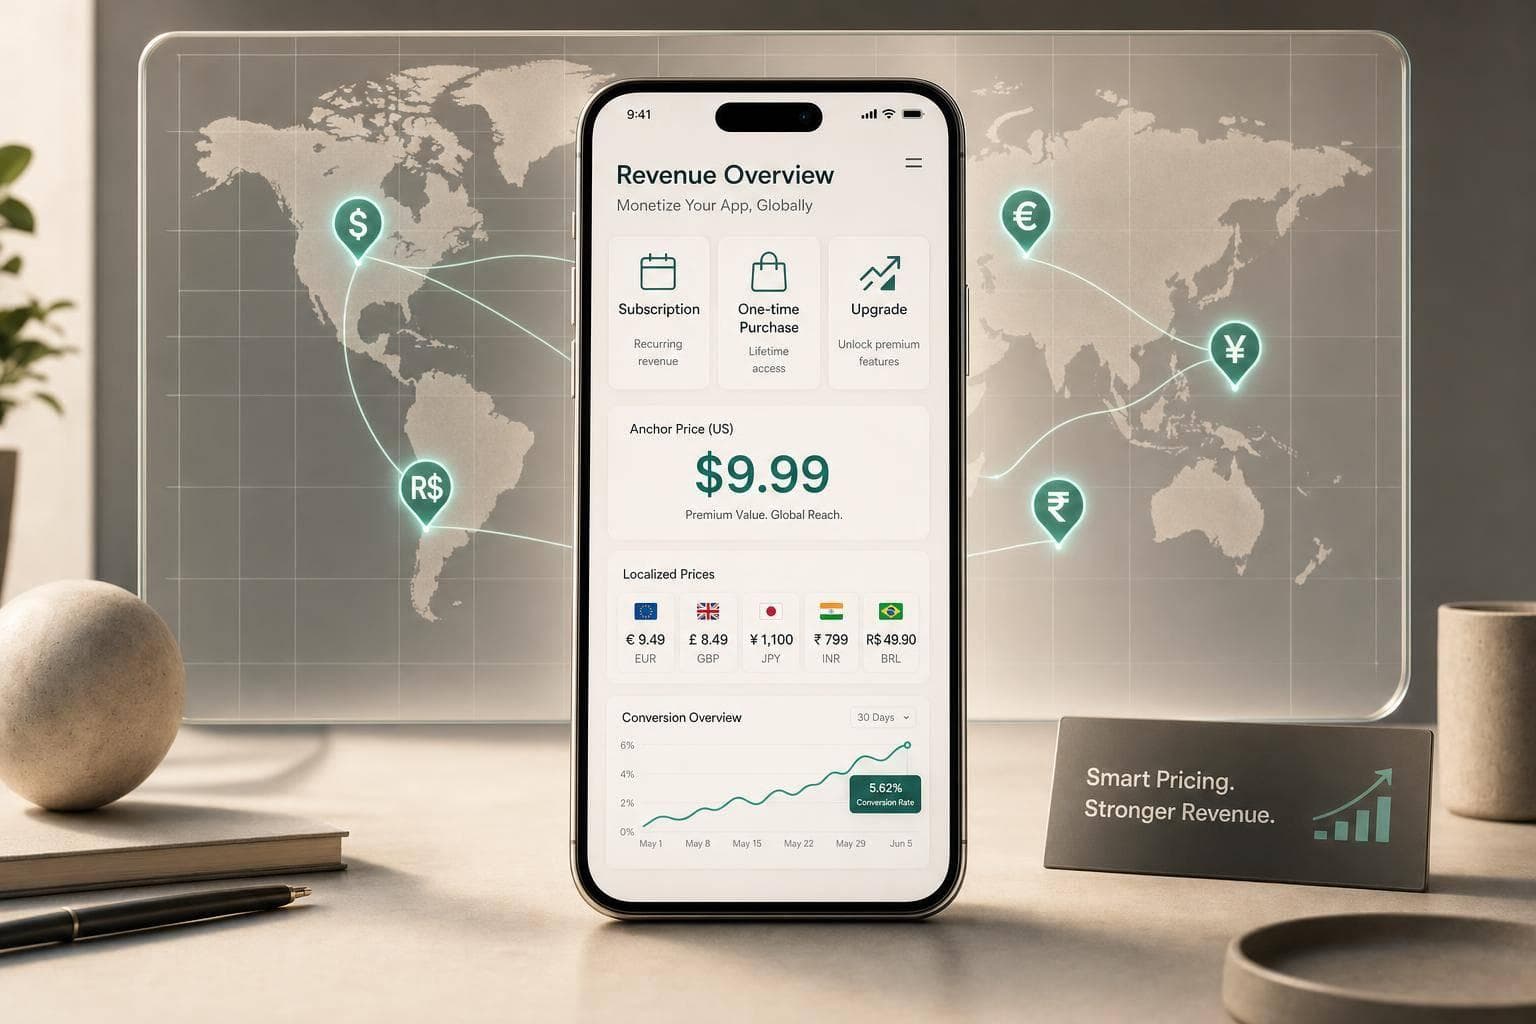
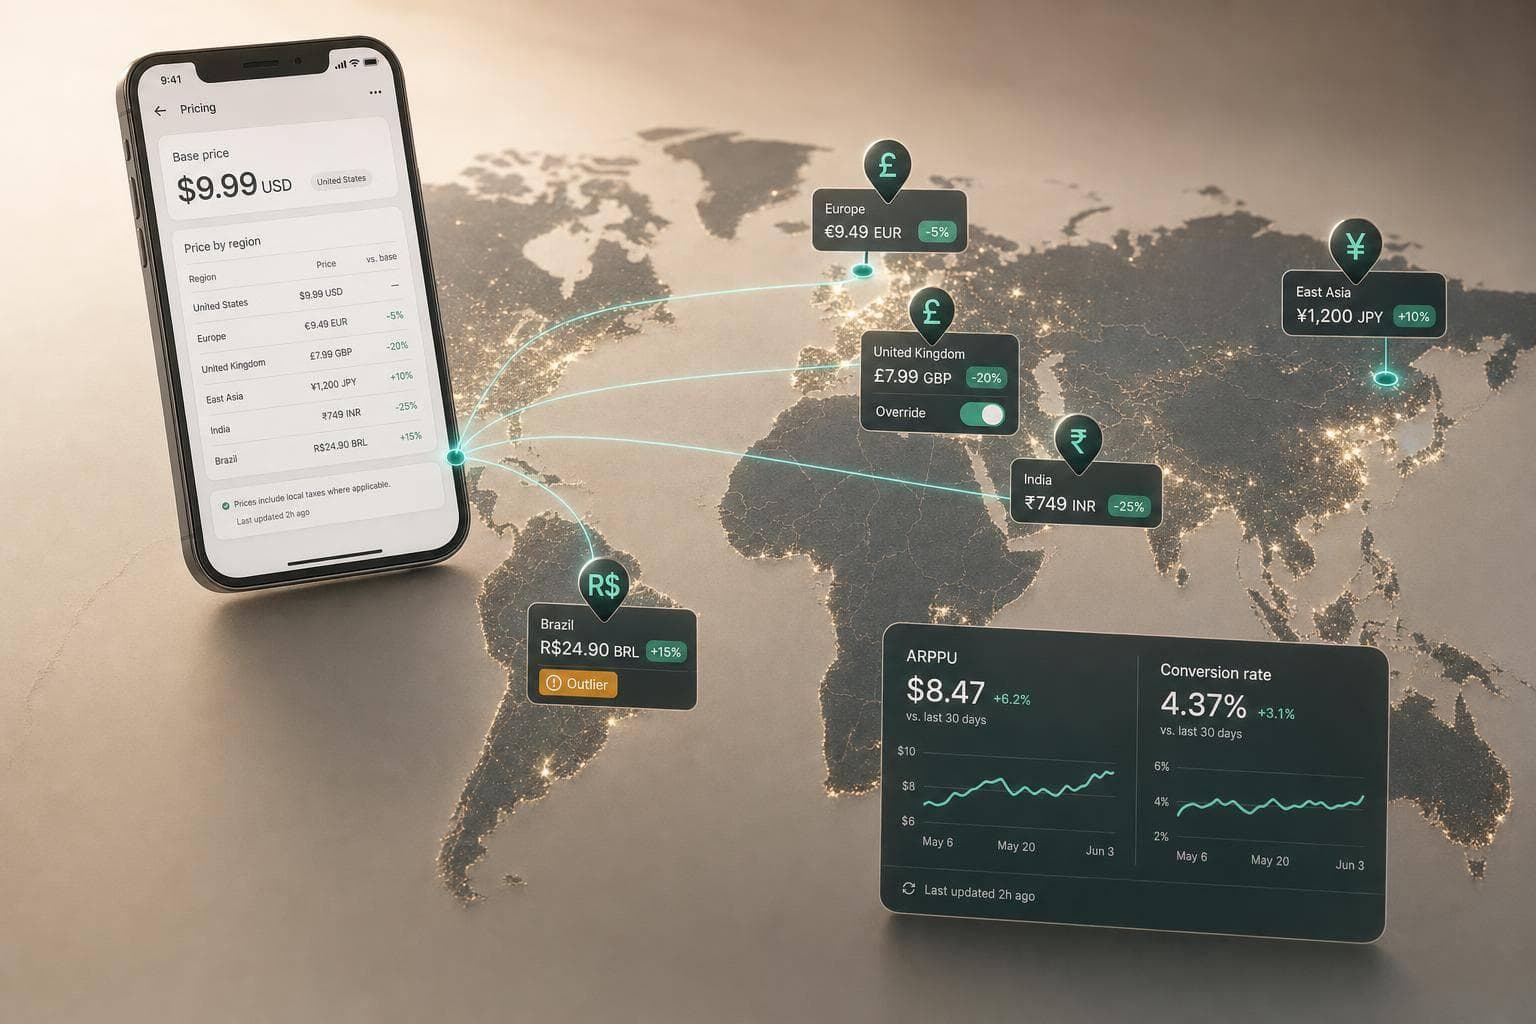
4. Turn US base prices into store-ready regional tiers
Start with a US anchor, then adjust by country purchasing power
Set a clear U.S. base price for each tier, then use that as an anchor rather than a global default. The plan structure stays the same; what changes is the local price. That matters because currency conversion alone is not localisation. A $9.99 price in the U.S. can still land far too high in India.
Willingness to pay can vary by 2–3x across countries [8]. So Apple’s default conversion is a starting point, not the final answer. Some markets need a much deeper discount from the U.S. anchor, while others can sit only slightly below it or even above it [6]. Flo, for example, cut prices in Brazil and saw strong growth in non-English-speaking markets [6].
Map plans to App Store and Google Play price tiers
Execution depends on the store. Apple puts you on a fixed pricing ladder, while Google Play lets you set local-currency prices for each product. Either way, keep the same Entry, Standard, and Premium spacing in each market. If you change one tier, change the others as well so the ladder still makes sense [3][9][12].
Local price endings matter more than teams often expect. Use thresholds that look normal in each country, not numbers that feel machine-converted.
- In the U.S., .99 endings still tend to work well.
- In India, ₹499 and ₹999 feel native.
- In Japan, round figures such as ¥500 or ¥1,000 are more natural, and pricing too low can hurt conversion because it can signal lower quality [3][11].
The same rule travels well: make the price look local.
Use Mirava for pricing decisions and RevenueCat, Adapty, Purchasely, or Superwall for execution
Once pricing is decided, the workflow shifts from analysis to implementation. Mirava sits upstream as the pricing intelligence layer. It estimates country-level prices, rounds them to local norms, maps them to store pricing structures, and previews likely revenue impact before launch.
After that, the billing and paywall stack takes over. RevenueCat handles billing and entitlements. Purchasely manages subscription setup. Adapty and Superwall support paywall testing, which helps you check which localised price works best in each market [6][8].
This is not a minor lever. Localised pricing was the highest-winning paywall experiment in 2026, with a 62.3% success rate, ahead of trial structure and plan duration tests [13][8]. For upkeep, review local prices every quarter, and check volatile markets such as Turkey or Argentina more often so currency moves and tax changes do not quietly push pricing out of range [3][9].
Conclusion: A simple framework for cleaner plans and better regional pricing
The framework is straightforward: build three clear tiers, keep monthly and annual plans the same apart from commitment length, and localize prices market by market. When the plan structure is clean, pricing becomes the next lever to optimise.
Regional pricing can lift conversion in emerging markets, while default App Store and Google Play conversions often miss what people are willing to pay locally. Prices should match local purchasing power and follow native price conventions, not just store-converted figures [3][5].
Once pricing is set, execution should sit with your billing and paywall stack. Keep those roles separate. Mirava sets the pricing layer upstream, while RevenueCat, Adapty, Purchasely, and Superwall handle billing, entitlements, and paywalls. After launch, prices need regular review as markets shift.
Review localized prices every quarter so currency moves and tax changes don’t leave pricing out of range [3][9].
FAQs
How do I know if I really need three tiers?
Three tiers work well when the goal is to maximise revenue through pricing psychology, not just put more options on the screen. The premium plan sets the anchor. The entry plan can play the decoy role, nudging people toward the middle best-value option.
With one tier, the choice is binary: buy or leave. With four or more, people often stall because the decision feels heavier than it should. Three tiers also line up neatly with three common segments: budget-conscious users, mainstream users, and power users.
What should I do if users mostly choose the cheapest plan?
If most users keep picking your cheapest plan, the issue often isn’t demand. It’s how the pricing ladder is framed. Your value ladder or price anchoring likely isn’t clear enough.
Use a three-tier structure. Make the middle tier your target plan, mark it as the best value, and keep the lowest tier basic enough that it feels limited rather than like the obvious pick.
The top tier should work as an anchor. Its job is to make the middle option feel more reasonable on price, while still giving higher-intent users a premium path.
On the tooling side, RevenueCat, Adapty, Purchasely, and Superwall can support paywalls and entitlements. Mirava sits upstream as the pricing intelligence layer, helping teams determine the right pricing gaps between plans.
How often should I update localized subscription prices?
For most apps, a solid cadence is to review and update localized subscription prices quarterly. If your app is still early in finding product-market fit, you may want to review more often so you can learn faster and adjust pricing with less lag.
Whatever schedule you set, refresh your underlying PPP data every 6 to 12 months. Inflation shifts, local economies move, and platform FX updates don’t always keep your pricing in line with what users can actually pay. Apple and Google may account for exchange-rate changes, but a manual review still matters if you want prices to stay aligned with local purchasing power and category norms.